RSS

Category Archives: Tips & Tricks

Noderunner.exe is taking too much memory in SharePoint 2013 Server


In SharePoint 2013 farm noderunner.exe is taking too much memory.

The issue is related to new Search service

“There is one node runner process for each engine in the SharePoint search service application. E.g. Query, index, content processing, etc will all have an individual node runner.”

About New Search Service

The architecture of search has undergone lot of changes in SharePoint 2013. Many of the core components are replaced by the FAST Search components. Below are a few new components which are added in the new architecture.

  1. Crawl Component
  2. Content Processing Component
  3. Query Processing Component
  4. Index Component
  5. Analytic Processing Component

All these components run as a process called ‘noderunner.exe‘. On a default single server installation of SharePoint there will five instances of noderunner.exe (one for each of the component listed above). There is another process called ‘Host Controller’, which monitors the noderunner processes. If any of the noderunner.exe fails, the host runner will restart that process.

Production Server Tip
If this is a production SharePoint infrastructure, then you should scale your farm appropriately to suit both the business requirements of your organisation and the technical requirements to meet those business demands.

Development Server Tip (How to Optimize Memory?)
If this is Development server, then follow below steps. By default the performance level for a Search Service is set to Maximum. Using the below powershell cmdlet we can reduce the performance level to Reduced

  1. Open SharePoint Management PowerShell window and execute the below command
    Set-SPEnterpriseSearchService -PerformanceLevel Reduced
  2. Open the config file at C:\Program Files\Microsoft Office Servers\15.0\Search\Runtime\1.0\noderunner.exe.config and change the value of memoryLimitMegabytes in node to some other value other than 0, say 100 or 200 which sets the cap limit for memory to be used.
  3. Restart the machine or service.
 
Leave a comment

Posted by on November 11, 2014 in SharePoint 2013, Tips & Tricks


Tags: , ,

Windows Server App Fabric is not correctly configured – SharePoint 2013 Setup Errors


When installing SharePoint 2013 SP1 prerequisites on Windows Server 2008 R2, the prerequisite installer fails with the following error

Error

image_thumb

“Windows Server App Fabric is not correctly configured. You should uninstall Windows Server Appfabric and reinstall it using the Sharepoint Products Preparation Tool.”

Cause
This occurs when u try to run “PREREQUISITEINSTALLER.exe” as standalone installation.

Resolution
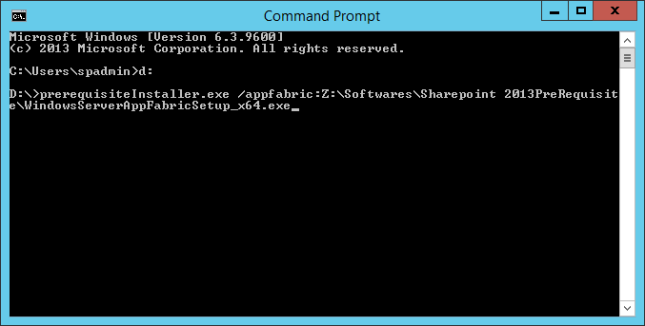
The resolution is to run “prerequisiteinstaller.exe” with command line parameters to directly specify the file name for each prerequisite.

  1. Uninstall exisiting installation of AppFabric
  2. Delete “PSModulePath” from system environment variables entry.
  3. Restart server
  4. Open command prompt
  5. Navigate to SharePoint 2013 setup files folder (eg: D:\)
  6. Type following line
    prerequisiteInstaller.exe /appfabric:Z:\Softwares\Sharepoint 2013PreRequisite\WindowsServerAppFabricSetup_x64.exe
    (NOTE:  Z: is my Prerequisite files folder location. replace with you path)
    MAKE SURE THERE IS NO SPACE FOR FOLDER NAME
    sp2013-prereq
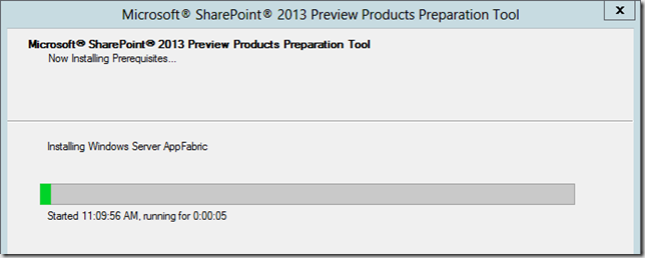
  7. image_thumb_6
  8. Done! Continue installation…
 
3 Comments

Posted by on September 20, 2014 in Bug, SharePoint 2013, Tips & Tricks


Tags: ,

Useful URL Shortcuts in SharePoint


Page Name URL
1. Sign in as a different user /_layouts/closeConnection.aspx?loginasanotheruser=true
2. Open Page in Edit Mode ?ToolPaneView=2
3. Web Part Maintenance Page ?Contents=1
4. Site settings page /_layouts/settings.aspx
5. View all site content page /_layouts/viewlsts.aspx
6. Get the version of the SharePoint server /_vti_pvt/Service.cnf
7. Sandboxed Solution Gallery: /_catalogs/solutions/Forms/AllItems.aspx
8. Workflow history hidden list: /lists/Workflow History
9. Filter toolbar for Lists and libraries ?Filter=1
10. Site usage page /_layouts/usage.aspx
11. Site content and structure  page /_layouts/sitemanger.aspx
12. Manage site collection features
(CASE SENSITIVE )
/_layouts/ManageFeatures.aspx?Scope=Site
13. Manage site features /_layouts/ManageFeatures.aspx
14. Show Page in Dialog View ?isdlg=1
15. Application page for registering SharePoint apps /_layouts/15/appregnew.aspx
16. Save Site as a template /_layouts/savetmpl.aspx
17. Enable SharePoint designer /_layouts/SharePointDesignerSettings.aspx
18. Set Welcome Page /_layouts/AreaWelcomePage.aspx
19. Change Site Master Page /_layouts/ChangeSiteMasterPage.aspx
20. Page Layouts and Site Templates /_Layouts/AreaTemplateSettings.aspx
21. Master Pages library /_catalogs/masterpage/Forms/AllItems.aspx
22. User Information List _catalogs/users/simple.aspx
23. Quick Deploy List Quick%20Deploy%20Items/AllItems.aspx
24. Taxonomy Hidden List (MMS) Lists/TaxonomyHiddenList/AllItems.aspx
25. Force displaying the user profile in the site

collection:

/_layouts/userdisp.aspx?id={UserID}&Force=True
 
Leave a comment

Posted by on July 31, 2014 in Tips & Tricks


Tags: ,

Sharepoint “Workflow Auto Cleanup” mystery


Does anyone know that SharePoint workflow history is getting deleted after 60days. By default there is a timer job called “Workflow Auto Cleanup” associated with your web application which will delete all your workflow task history after 60 days  if the status is  Completed or Cancelled.

Now the question is, Does it really deletes whole workflow history?

No, Technically, the workflow history is not deleted. The association between the workflow (what you see on the workflow status page) and the history list is removed. This is done for performance reasons. Once a workflow is completed, by default the connection between the workflow and the workflow history is deleted after 60 days.

Is it Possible to disable this timer job?

Yes, You can disable the “Workflow Auto Cleanup” timer job if you wish to keep the workflow data. however, this is not really recommended due to the potential impact to performance of allowing these lists to grow indefinitely.

To disable automatic workflow cleanup follow below steps

  • From Central Administration, click the Monitoring tab 
  • On the Monitoring page, click Review job definitions.
  • On the Timer Job Definitions page, click Workflow Auto Cleanup to edit the appropriate timer job.
  • On the Edit Timer Job page, click Disable and then click OK to disable the Workflow Auto Cleanup feature.

NOTE: If you later decide that you want to enable automatic workflow cleanup, access this page again and click Enable to enable automatic workflow cleanup.

What is the alternate solution to audit my workflows?

Unfortunately, this auditing report is not available out of the box. However, a custom audit report can be created in Visual Studio in order to extend the auditing functionality to include workflows.Read here


Tags: , ,

How to delete SharePoint 2010 timer job definition?


  1. Navigate to Central Administration
  2. Then Operations > Timer Job definitions
  3. Find you timer job from the list and click to open the page
  4. Copy the JobId from URL eg: http://MyServer:123/_admin/JobEdit.aspx?JobId=XXX-XXX-XXX-XX)
  5. Copy to NotePad and replace the %2D characters by a dash “-“
  6. Then Open Sharepoint Powershell command window and use below command
    stsadm.exe -o deleteconfigurationobject -id <ObjectGUID> 

Volila!!

 
1 Comment

Posted by on September 12, 2012 in Sharepoint Server 2010, Tips & Tricks


Tags:

Flash / swf not working in sharepoint 2010


By default flash files are disabled by sharepoint 2010. You can enable flash by following steps

  1. Navigate to central administration >
  2. Application Management > Manage Web applications >
  3. Then select your web application >
  4. From top ribbon select > general settings > general settings>
  5. Navigate to “Browser File Handling”
  6. Select Permissive
  7. Done

NOTE:
By default “Browser file handling” is in Strict mode.
Browser file handling specifies whether additional security headers are added to documents served to web browsers. These headers specify that a browser should show a download prompt for certain types of files (for example, .html) and to use the server’s specified MIME type for other types of files.
Permissive: Specifies no headers are added, which provides a more compatible user experience.
Strict:Adds headers that force the browser to download certain types of files. The forced download improves security for the server by disallowing the automatic execution of Web content that contributors upload.


Tags: ,

Some useful Sharepoint 2010 resources for Techies.


  1. Microsoft SharePoint 2010: Building Solutions for SharePoint 2010 by Sahil Malik
  2. Sharepoint 2010 Hands on Lab for Developers
  3. Useful Sharepoint 2010  Technical Diagrams
  4. SharePoint 2010 Advanced IT Professional Training
  5. Sharepoint 2010 Architecture related blog
  6. SharePoint 2010 Developer Virtual Labs Online Blog
 

Tags: , ,

Disable Person Link in Data View Web Part in Sharepoint 2010 & 2007


When displaying the column @Author in a Data View Web Part (DVWP) SharePoint displays a link to the UserDisp.aspx page.

If you don’t want to have the link just extract the Person’s name from the column HTML generated code.

Just replace:

<xsl:value-of disable-output-escaping=”yes” select=”@Author”/>

By:

2007
<xsl:value-of disable-output-escaping=”yes” select=”substring-after(substring-before(substring-after(@Author, ‘ID=’), ‘&lt;’), ‘&gt;’)”/>

UPDATED:

Here is the code for Sharepoint 2010 version

<xsl:value-of disable-output-escaping=”yes” select=”substring-after(substring-before(substring-after(@Author, ‘ID=’), ‘&lt;’), ‘&gt;’)”/>
 
2 Comments

Posted by on March 27, 2011 in Sharepoint Designer, Tips & Tricks


Tags: ,

How to enable Sharepoint spell checker in custom pages ?


1. Make sure you have the right page directive on the page you are adding the control to

 <%@ Register TagPrefix=”SharePoint” Namespace=”Microsoft.SharePoint.WebControls” Assembly=”Microsoft.SharePoint, Version=12.0.0.0, Culture=neutral, PublicKeyToken=71e9bce111e9429c” %>

2. On the head of your page, add the following controls, which will give you the javascript required for the spell checker to run:

<SharePoint:ScriptLink ID=”ScriptLink1″ Language=”javascript” Name=”core.js” runat=”server” />
<SharePoint:ScriptLink ID=”ScriptLink2″ Language=”javascript” Name=”bform.js” runat=”server” />
<SharePoint:ScriptLink ID=”ScriptLink3″ Language=”javascript” Name=”SpellCheckEntirePage.js” runat=”server” />

3. Add the following block of javascript code to your page:

<script language=”javascript” type=”text/javascript”>
function doSpellCheck() {
SpellCheckEntirePage(‘/_vti_bin/SpellCheck.asmx’, ‘/_layouts/SpellChecker.aspx’);
}</script>
NOTE: Take care of single quotes after pasting
4. Now all you need to do is create a link or a button which starts the spell checker. to this you just need to add the onclick javascript method ‘doSpellCheck()’

<a href=”javascript:doSpellCheck()”>Spelling…</a>

NOTE: if you want to exclude spell checker of any control use excludeFromSpellCheck”true”
eg:

 
2 Comments

Posted by on January 18, 2011 in Sharepoint Designer, Tips & Tricks


Tags: