RSS

How to setup new SharePoint Framework (SPFx) development Environment & Build your First Client Side Webpart?


Note: As per Microsoft site, The SharePoint Framework is currently in preview and is subject to change. SharePoint Framework client-side web parts are not currently supported for use in production environments.

The SharePoint Framework (SPFx) is the next evolution in SharePoint development

Below are some steps required to setup new SharePoint Framework & Create your first client web part from you client PC

  1. Install Node JS

    • Install NodeJS Long Term Support (LTS) version from here
    • After installation, Typ npm -v to verify the version. Make sure you are running V3 version of npm.
    • You can use nodejs commandline or  CMDER or Windows powershell tool to run npm in windows.
  2. Install Yeoman

    Yeoman is the modern scaffolding tool. It helps you kick-start new projects, and prescribes best practices and tools to help you stay productive.

    • Type npm install -g yo to install Yeoman
    • It is a good idea to check that everything is installed as expected by running commonly used Yeoman commands like below::yo –version
  3. Install Gulp

    Gulp is a javascript task runner that lets you automate tasks such as Bundling and minifying libraries and stylesheets,Refreshing your browser when you save a file,Quickly running unit tests, Copying modified files to an output directory etc.

    • Install the gulp command npm install –global gulp-cli
  4. Install Yeoman SharePoint Generator

    The Yeoman SharePoint web part generator helps you quickly create a SharePoint client-side solution project with the right toolchain and project structure.

    • Enter the following command to install the Yeoman SharePoint generator:
      npm install -g @microsoft/generator-sharepoint
  5. Build your First Client Side Webpart

    1. Open CMDER or Node.js command line
    2. Navigate to your favorite projects folder
    3. Create New Project directory
      md myFirstClientWebpartFolder
    4. Navigate to newly created project directory
      cd myFirstClientWebpartFolder
    5. Create a new Client side webpart by running  Yeoman SharePoint Generator by running below command
      yo @microsoft/sharepoint

      When prompted:

      1. What is your solution name? myFirstClientWebpart
      2. Where do you want to place your files? Use current folder
      3. what is your webpart name?Helloworld
      4. what is your webpart description? Helloworld  description
      5. what framweork would you like to start with? (Use arrow keys to select)
    6. At this point, Yeoman will install the required dependencies and scaffold the solution files along with the HelloWorld web part. This might take a few minutes.
      When the scaffold is complete, you should see a Congratulations message.
  6. Run application using Gulp

    To run the application type  gulp serve to play with it.

  7. Open application in code editor

    Use your favorite code editor to explore the new file structure and code
    my recommendation is to use Visual Studio Code which is a  lightweight but powerful source code editor from Microsoft which runs on your desktop and is available for Windows, Mac and Linux. It comes with built-in support for JavaScript, TypeScript and Node.js and has a rich ecosystem of extensions for other languages (such as C++, C#, Python, PHP) and runtimes

  8. End of Initial Setup!

    • You are done!
    • Start experimenting new SharePoint development model and build amazing solutions.
    • Happy Coding…Cheers 🙂
 
Leave a comment

Posted by on January 21, 2017 in SharePoint 2016, SPFx, Uncategorized


Modern Web Development Stack support by Sharepoint


I’m really excited to know about the new Modern Web Development stack support by SharePoint.

Below are the list of new technologies every SharePoint developer must know

– Node.js & npm
– Gulp
– TypeScript
– Yeoman
– Git
– Office UI Fabric
– Webpack
– React
– Angular
– Knockout
– Handlebars
– Visual Studio Code
– Sublime
– Cmder
– Oh my zsh

Web stack tooling vs classic Microsoft tools

sp

 
Leave a comment

Posted by on December 25, 2016 in Uncategorized, Web Development


Tags: , ,

Configuring SharePoint 2013 Search Topology on Production Environment


Introduction

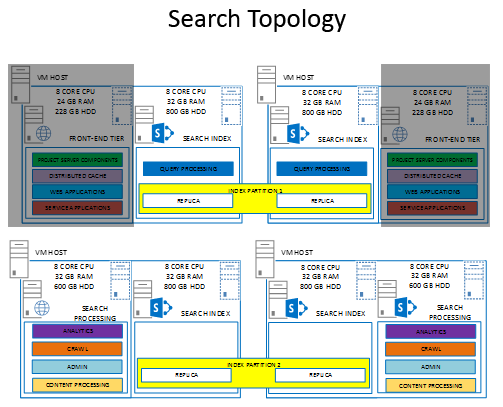
When you create Search Service application from central administration , a default search topology will be created automatically where all Search components are assigned to the server which is running the Central Administration but  in multi servers farm scenario you need to change this topology using PowerShell.

Sample Scenario

In the following scenario I’m using 6 search servers. You can change according to your requirement.

  • 2 Front end servers – running the Query Processing component to handle search query requests from user.
  • 4 Back end Servers – running rest of the search components

SearchTopology

Before You Begin

  1. Make sure you have created a Search service application from central admin
  2. Make sure currently logged user is added as admin in Search service application
  3. Make sure index files are empty, Navigate to search service application administration and see Searchable Item appears as 0

Start configuration

Step 1: Prepare the Topology Variables

$hostA = Get-SPEnterpriseSearchServiceInstance -Identity "SERVER1"

$hostB = Get-SPEnterpriseSearchServiceInstance -Identity "SERVER2"

$hostC = Get-SPEnterpriseSearchServiceInstance -Identity "SERVER3"

$hostD = Get-SPEnterpriseSearchServiceInstance -Identity "SERVER4"

$hostE = Get-SPEnterpriseSearchServiceInstance -Identity "SERVER5"

$hostF = Get-SPEnterpriseSearchServiceInstance -Identity "SERVER6"


Start-SPEnterpriseSearchServiceInstance -Identity $hostA

Start-SPEnterpriseSearchServiceInstance -Identity $hostB

Start-SPEnterpriseSearchServiceInstance -Identity $hostC

Start-SPEnterpriseSearchServiceInstance -Identity $hostD

Start-SPEnterpriseSearchServiceInstance -Identity $hostE

Start-SPEnterpriseSearchServiceInstance -Identity $hostF

Note: Wait for a while till above instances get started and proceed below to verify status

Step 2: Check Service status

Get-SPEnterpriseSearchServiceInstance -Identity $hostA

Get-SPEnterpriseSearchServiceInstance -Identity $hostB

Get-SPEnterpriseSearchServiceInstance -Identity $hostC

Get-SPEnterpriseSearchServiceInstance -Identity $hostD

Get-SPEnterpriseSearchServiceInstance -Identity $hostE

Get-SPEnterpriseSearchServiceInstance -Identity $hostF
NOTE: Make sure status is online for all instance, then proceed to next

Step3 : Setting up Topology

NOTE: Make sure below mentioned root directory is created manually on all servers including central admin server

$ssa = Get-SPEnterpriseSearchServiceApplication

$newTopology = New-SPEnterpriseSearchTopology -SearchApplication $ssa

NEW-SPENTERPRISESEARCHADMINCOMPONENT -SEARCHTOPOLOGY $NEWTOPOLOGY -SEARCHSERVICEINSTANCE $HOSTA

NEW-SPENTERPRISESEARCHCRAWLCOMPONENT -SEARCHTOPOLOGY $NEWTOPOLOGY -SEARCHSERVICEINSTANCE $HOSTA

NEW-SPENTERPRISESEARCHCONTENTPROCESSINGCOMPONENT -SEARCHTOPOLOGY $NEWTOPOLOGY -SEARCHSERVICEINSTANCE $HOSTA

NEW-SPENTERPRISESEARCHANALYTICSPROCESSINGCOMPONENT -SEARCHTOPOLOGY $NEWTOPOLOGY -SEARCHSERVICEINSTANCE $HOSTA


NEW-SPENTERPRISESEARCHADMINCOMPONENT -SEARCHTOPOLOGY $NEWTOPOLOGY -SEARCHSERVICEINSTANCE $HOSTB

NEW-SPENTERPRISESEARCHCRAWLCOMPONENT -SEARCHTOPOLOGY $NEWTOPOLOGY -SEARCHSERVICEINSTANCE $HOSTB

NEW-SPENTERPRISESEARCHCONTENTPROCESSINGCOMPONENT -SEARCHTOPOLOGY $NEWTOPOLOGY -SEARCHSERVICEINSTANCE $HOSTB

NEW-SPENTERPRISESEARCHANALYTICSPROCESSINGCOMPONENT -SEARCHTOPOLOGY $NEWTOPOLOGY -SEARCHSERVICEINSTANCE $HOSTB


NEW-SPENTERPRISESEARCHQUERYPROCESSINGCOMPONENT -SEARCHTOPOLOGY $NEWTOPOLOGY -SEARCHSERVICEINSTANCE $HOSTC

NEW-SPENTERPRISESEARCHINDEXCOMPONENT -SEARCHTOPOLOGY $NEWTOPOLOGY -SEARCHSERVICEINSTANCE $HOSTC -INDEXPARTITION 0 -RootDirectory “E:\SearchIndex”


NEW-SPENTERPRISESEARCHQUERYPROCESSINGCOMPONENT -SEARCHTOPOLOGY $NEWTOPOLOGY -SEARCHSERVICEINSTANCE $HOSTD

NEW-SPENTERPRISESEARCHINDEXCOMPONENT -SEARCHTOPOLOGY $NEWTOPOLOGY -SEARCHSERVICEINSTANCE $HOSTD -INDEXPARTITION 0 -RootDirectory “E:\SearchIndex”


NEW-SPENTERPRISESEARCHQUERYPROCESSINGCOMPONENT -SEARCHTOPOLOGY $NEWTOPOLOGY -SEARCHSERVICEINSTANCE $HOSTE

NEW-SPENTERPRISESEARCHINDEXCOMPONENT -SEARCHTOPOLOGY $NEWTOPOLOGY -SEARCHSERVICEINSTANCE $HOSTE -INDEXPARTITION 1 -RootDirectory “E:\SearchIndex”


NEW-SPENTERPRISESEARCHQUERYPROCESSINGCOMPONENT -SEARCHTOPOLOGY $NEWTOPOLOGY -SEARCHSERVICEINSTANCE $HOSTF

NEW-SPENTERPRISESEARCHINDEXCOMPONENT -SEARCHTOPOLOGY $NEWTOPOLOGY -SEARCHSERVICEINSTANCE $HOSTF -INDEXPARTITION 1 -RootDirectory “E:\SearchIndex”

Step 4: Activate The Topology

SET-SPENTERPRISESEARCHTOPOLOGY -IDENTITY $NEWTOPOLOGY

Step 5: Verify the Topology

GET-SPENTERPRISESEARCHTOPOLOGY -SEARCHAPPLICATION $SSA

Step 6 : Verify Each Component

GET-SPENTERPRISESEARCHSTATUS -SEARCHAPPLICATION $SSA -TEXT
 

Tags: ,

Sharepoint 2013 Workflow Setup and Configuration Complete Reference


One of the complicated and not well documented feature of SharePoint 2013 is the configuration of new Workflow. I personally struggled a lot to install and configure on my Development and Production environment. Like all i have googled a lot to get bits & pieces of tips and advises from each blog. After successful implementation i thought of consolidate everything and share my experience with you all. Below is a series of post which will focus on Workflow architecture, Configuration, Quality check , Known Issues and Fixes.

Appreciate your valuable comments if you like the series.

Table of contents

Series 1: Overview of SharePoint 2013 Workflow Architecture

Series 2: Setup and Configuration of SharePoint 2013 Workflow

Series 3: SharePoint 2013 troubleshoot checklist

Series 4: SharePoint 2013 Known Issues & Fixes

Series 1: Overview of SharePoint 2013 Workflow Architecture (1 of 4)

  • Workflow is now treated as a service in SharePoint 2013.
  • Workflows now  communicates with Sharepoint via core app model technologies like CSOM / REST.
  • SharePoint 2013 workflows are powered by Windows Workflow Foundation 4, which was substantially redesigned from earlier versions. Windows Workflow Foundation (WF), in turn, is built on the messaging functionality that is provided by Windows Communication Foundation (WCF).
  • It is important to note the relationship between workflow activities and SharePoint actions. Workflow activities represent the underlying managed objects whose methods drive workflow behaviors. Workflow actions, on the other hand, are wrappers that encapsulate the underlying activities and present them in a user-friendly form in SharePoint Designer. Workflow authors interact with the workflow actions, whereas the workflow execution engine acts on the corresponding activities.
  • SharePoint 2010 workflow has been carried forward to SharePoint Server 2013.

High-Level architecture

SharePointJim_WorklowArchitecture_13

Below information is extracted from MSDN article

Workflow Manager Client 1.0 is represented in SharePoint 2013 in the form of the Workflow Manager Client 1.0 Service Application Proxy. This component allows SharePoint to communicate and interact with the Workflow Manager Client 1.0 server. Server-to-server authentication is provided using OAuth.
SharePoint events for which a workflow is listening, like itemCreated, itemUpdated, and so on, are routed to Workflow Manager Client 1.0 using the Microsoft Azure service bus. For the return trip, the platform uses the SharePoint Representational State Transfer (REST) API to call back into SharePoint.
There are also additions to the SharePoint workflow object model, called collectively the Workflow Services Manager, which allow you to manage and control your workflows and their execution. The primary zones of interaction for the services manager are deployment, messaging, instance control, and (for backward compatibility) interoperability with SharePoint 2010 workflows.
Finally, there is the workflow authoring component. SharePoint Designer can now create and deploy both SharePoint 2010 and SharePoint 2013 workflows. Visual Studio 2012 not only provides a designer surface for creating declarative workflows, but it can also create SharePoint Add-ins and solutions that fully integrate Workflow Manager Client 1.0 functionality.

Next >>  Series 2: Setup and Configuration of SharePoint 2013 Workflow (2 of 4)

 
Leave a comment

Posted by on February 24, 2016 in SharePoint 2013, Uncategorized, Workflow


Tags: ,

Performance tuning tips for SharePoint 2013 Development server


1. Reduce performance of Search (Noderunner.exe)

· Get-SPEnterpriseSearchService if it returns “Maximum” then Set it to “Reduced” using below code.

· Set-SPEnterpriseSearchService -PerformanceLevel Reduced

2. Reduce Memory consumed by search processes

· Open the config file at C:\Program Files\Microsoft Office Servers\15.0\Search\Runtime\1.0\noderunner.exe.config and change the value of memoryLimitMegabytes in node to some other value other than 0, say 100 or 200 which sets the cap limit for memory to be used.

· Restart Search service or Server

3. Limit SQL Server’s RAM Maximum usage

· in SQL manager right click the server, properties, memory, change value to small value

4. Set Database Recovery Model

· Right click database > properties > Options> Change Recovery model to “Simple”

 
Leave a comment

Posted by on January 20, 2016 in Development Server, SharePoint 2013


Tags: ,

Some useful SharePoint 2013 URL Strings and Tokens


SharePoint provides several tokens that are useful for constructing a context-specific URL.

Token Resolves To
~site Refers to the URL of the current Web site.
~sitecollection Refers to the URL of the parent site collection of the current Web site.
~layouts Refers to _layouts/15 with respect to the Web application.
~sitecollectionlayouts Refers to the layouts folder in thecurrent site collection (such as /sites/mysite/_layouts/15).
~sitelayouts Refers to the layouts folder in the current site (such as site/mysite/mysubsite/_layouts/15)

To learn more about URL strings and tokens, see the Microsoft Development Center

 
Leave a comment

Posted by on January 8, 2015 in SharePoint 2013, Token, URL


Tags: ,

Noderunner.exe is taking too much memory in SharePoint 2013 Server


In SharePoint 2013 farm noderunner.exe is taking too much memory.

The issue is related to new Search service

“There is one node runner process for each engine in the SharePoint search service application. E.g. Query, index, content processing, etc will all have an individual node runner.”

About New Search Service

The architecture of search has undergone lot of changes in SharePoint 2013. Many of the core components are replaced by the FAST Search components. Below are a few new components which are added in the new architecture.

  1. Crawl Component
  2. Content Processing Component
  3. Query Processing Component
  4. Index Component
  5. Analytic Processing Component

All these components run as a process called ‘noderunner.exe‘. On a default single server installation of SharePoint there will five instances of noderunner.exe (one for each of the component listed above). There is another process called ‘Host Controller’, which monitors the noderunner processes. If any of the noderunner.exe fails, the host runner will restart that process.

Production Server Tip
If this is a production SharePoint infrastructure, then you should scale your farm appropriately to suit both the business requirements of your organisation and the technical requirements to meet those business demands.

Development Server Tip (How to Optimize Memory?)
If this is Development server, then follow below steps. By default the performance level for a Search Service is set to Maximum. Using the below powershell cmdlet we can reduce the performance level to Reduced

  1. Open SharePoint Management PowerShell window and execute the below command
    Set-SPEnterpriseSearchService -PerformanceLevel Reduced
  2. Open the config file at C:\Program Files\Microsoft Office Servers\15.0\Search\Runtime\1.0\noderunner.exe.config and change the value of memoryLimitMegabytes in node to some other value other than 0, say 100 or 200 which sets the cap limit for memory to be used.
  3. Restart the machine or service.
 
Leave a comment

Posted by on November 11, 2014 in SharePoint 2013, Tips & Tricks


Tags: , ,

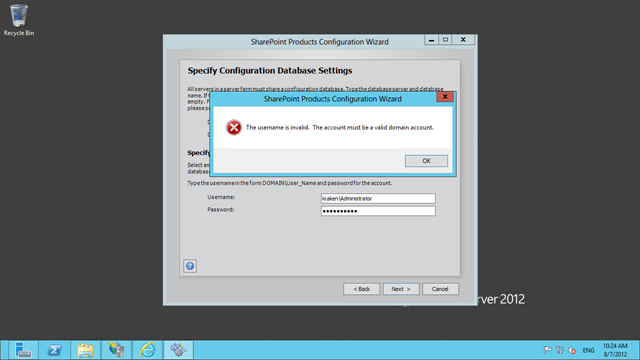
The username is invalid. The account must be a valid domain account – SharePoint 2013 Setup Error


When configuring SharePoint 2013 Development Virtual server in “Complete” mode you get below issue.

Error

1

“The username is invalid. The account mist be a valid domain account” when using a local account to configure the farm”

NOTE: Out of the box SharePoint only supports “Stand-alone” mode for non domain environments, but this forces you to use SQL Server 2008 R2 Express Edition which is most cases is unacceptable.

Solution
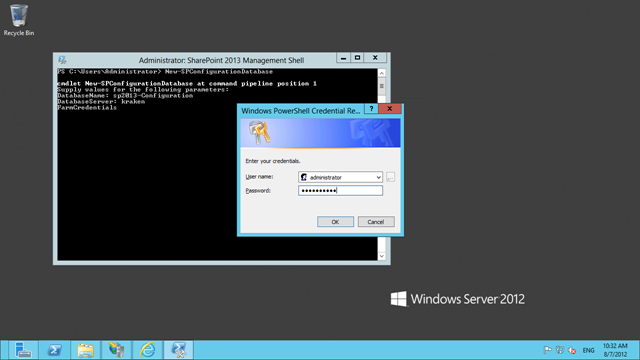
Use a PowerShell command to create the initial configuration of the farm with a local account:

  1. Start the SharePoint Management PowerShell
  2. Run “New-SPConfigurationDatabase” from the command line and follow the instructions
    Database Name: Sharepoint_Config
    DatabaseServer: Name of your SQL Server
    Farm Credentials : localservername\username
    Passphrase : Must contain at 8 character with one Caps,one number,& special character
    2
  3. This will create the farm and configure the necessary accounts.
  4. Rerun the configuration wizard
  5. After it finishes start the Config Wizard and configure your server with all components
  6. Select “Do not disconnect from this server farm

    3

  7. Done!


Leave a comment

Posted by on September 20, 2014 in SharePoint 2013


Tags: ,

Windows Server App Fabric is not correctly configured – SharePoint 2013 Setup Errors


When installing SharePoint 2013 SP1 prerequisites on Windows Server 2008 R2, the prerequisite installer fails with the following error

Error

image_thumb

“Windows Server App Fabric is not correctly configured. You should uninstall Windows Server Appfabric and reinstall it using the Sharepoint Products Preparation Tool.”

Cause
This occurs when u try to run “PREREQUISITEINSTALLER.exe” as standalone installation.

Resolution
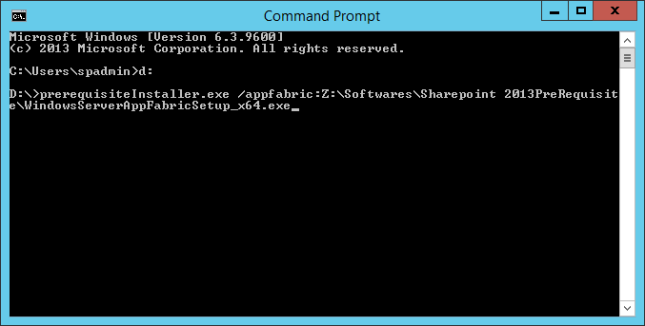
The resolution is to run “prerequisiteinstaller.exe” with command line parameters to directly specify the file name for each prerequisite.

  1. Uninstall exisiting installation of AppFabric
  2. Delete “PSModulePath” from system environment variables entry.
  3. Restart server
  4. Open command prompt
  5. Navigate to SharePoint 2013 setup files folder (eg: D:\)
  6. Type following line
    prerequisiteInstaller.exe /appfabric:Z:\Softwares\Sharepoint 2013PreRequisite\WindowsServerAppFabricSetup_x64.exe
    (NOTE:  Z: is my Prerequisite files folder location. replace with you path)
    MAKE SURE THERE IS NO SPACE FOR FOLDER NAME
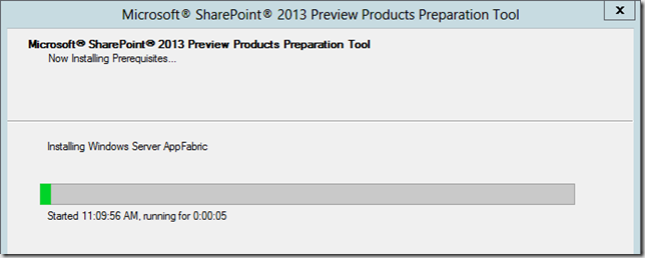
    sp2013-prereq
  7. image_thumb_6
  8. Done! Continue installation…
 
3 Comments

Posted by on September 20, 2014 in Bug, SharePoint 2013, Tips & Tricks


Tags: ,

Useful URL Shortcuts in SharePoint


Page Name URL
1. Sign in as a different user /_layouts/closeConnection.aspx?loginasanotheruser=true
2. Open Page in Edit Mode ?ToolPaneView=2
3. Web Part Maintenance Page ?Contents=1
4. Site settings page /_layouts/settings.aspx
5. View all site content page /_layouts/viewlsts.aspx
6. Get the version of the SharePoint server /_vti_pvt/Service.cnf
7. Sandboxed Solution Gallery: /_catalogs/solutions/Forms/AllItems.aspx
8. Workflow history hidden list: /lists/Workflow History
9. Filter toolbar for Lists and libraries ?Filter=1
10. Site usage page /_layouts/usage.aspx
11. Site content and structure  page /_layouts/sitemanger.aspx
12. Manage site collection features
(CASE SENSITIVE )
/_layouts/ManageFeatures.aspx?Scope=Site
13. Manage site features /_layouts/ManageFeatures.aspx
14. Show Page in Dialog View ?isdlg=1
15. Application page for registering SharePoint apps /_layouts/15/appregnew.aspx
16. Save Site as a template /_layouts/savetmpl.aspx
17. Enable SharePoint designer /_layouts/SharePointDesignerSettings.aspx
18. Set Welcome Page /_layouts/AreaWelcomePage.aspx
19. Change Site Master Page /_layouts/ChangeSiteMasterPage.aspx
20. Page Layouts and Site Templates /_Layouts/AreaTemplateSettings.aspx
21. Master Pages library /_catalogs/masterpage/Forms/AllItems.aspx
22. User Information List _catalogs/users/simple.aspx
23. Quick Deploy List Quick%20Deploy%20Items/AllItems.aspx
24. Taxonomy Hidden List (MMS) Lists/TaxonomyHiddenList/AllItems.aspx
25. Force displaying the user profile in the site

collection:

/_layouts/userdisp.aspx?id={UserID}&Force=True
 
Leave a comment

Posted by on July 31, 2014 in Tips & Tricks


Tags: ,